Notes, worked examples and practice for this topic are being written by our tutors. The past-paper questions below are ready now: work each one on paper, then open the mark scheme and the examiner's comment.
Tap a question to zoom it. Mark scheme and examiner's comment open under each question.
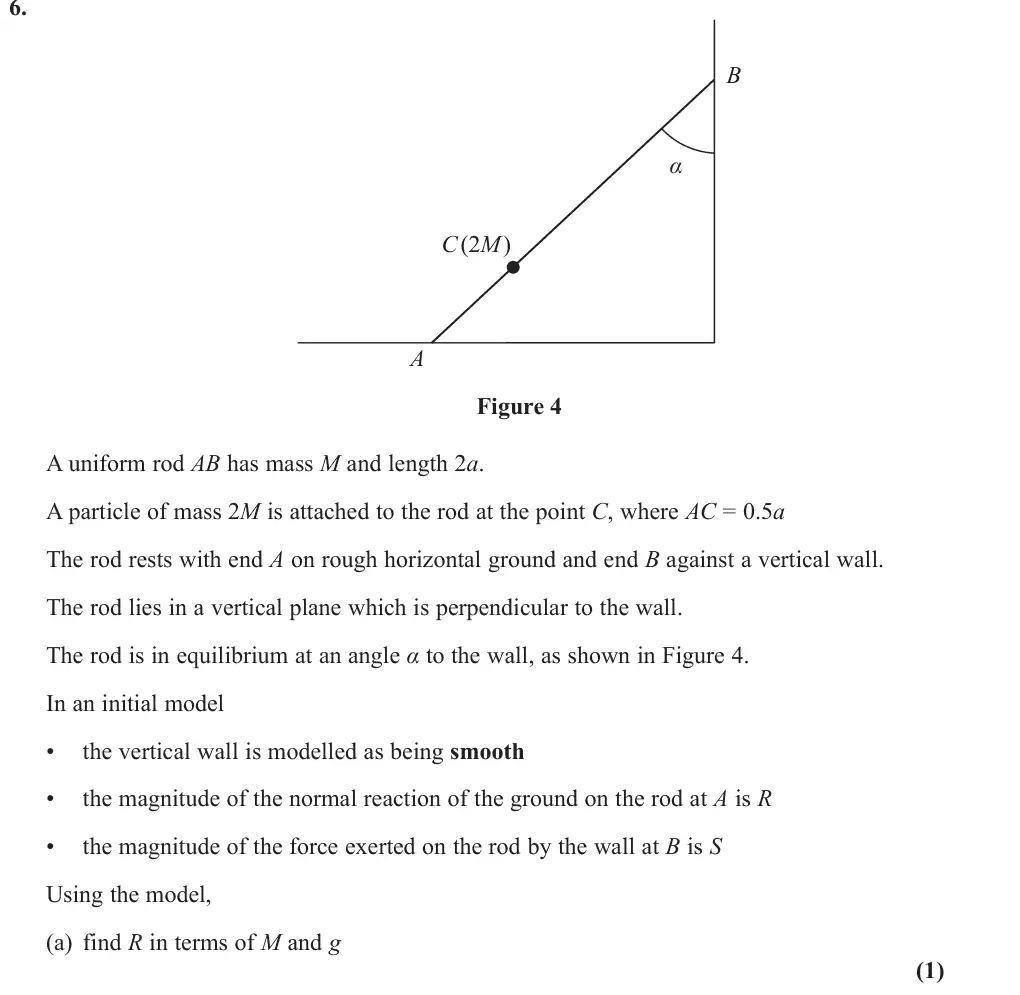
June 2025 · Paper 3 (Mechanics) · Q6(a)1 mark
Mark scheme (whole question; this part is marked with the orange bar)
Examiner's comment
In part (a) most wrote down the correct answer of 3Mg for the reaction force using vertical resolution. The most common error was omitting the weight term for the rod and a few included trigonometric functions in their resolutions.
Common mistakes
resolve vertically: R = Mg + 2Mg = 3Mg
omitting the weight of the rod
no trig needed
June 2025 · Paper 3 (Mechanics) · Q6(b)3 marks
Mark scheme (whole question; this part is marked with the orange bar)
Examiner's comment
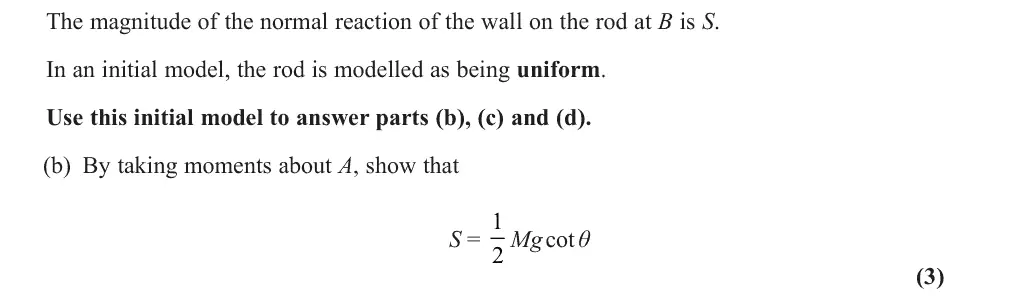
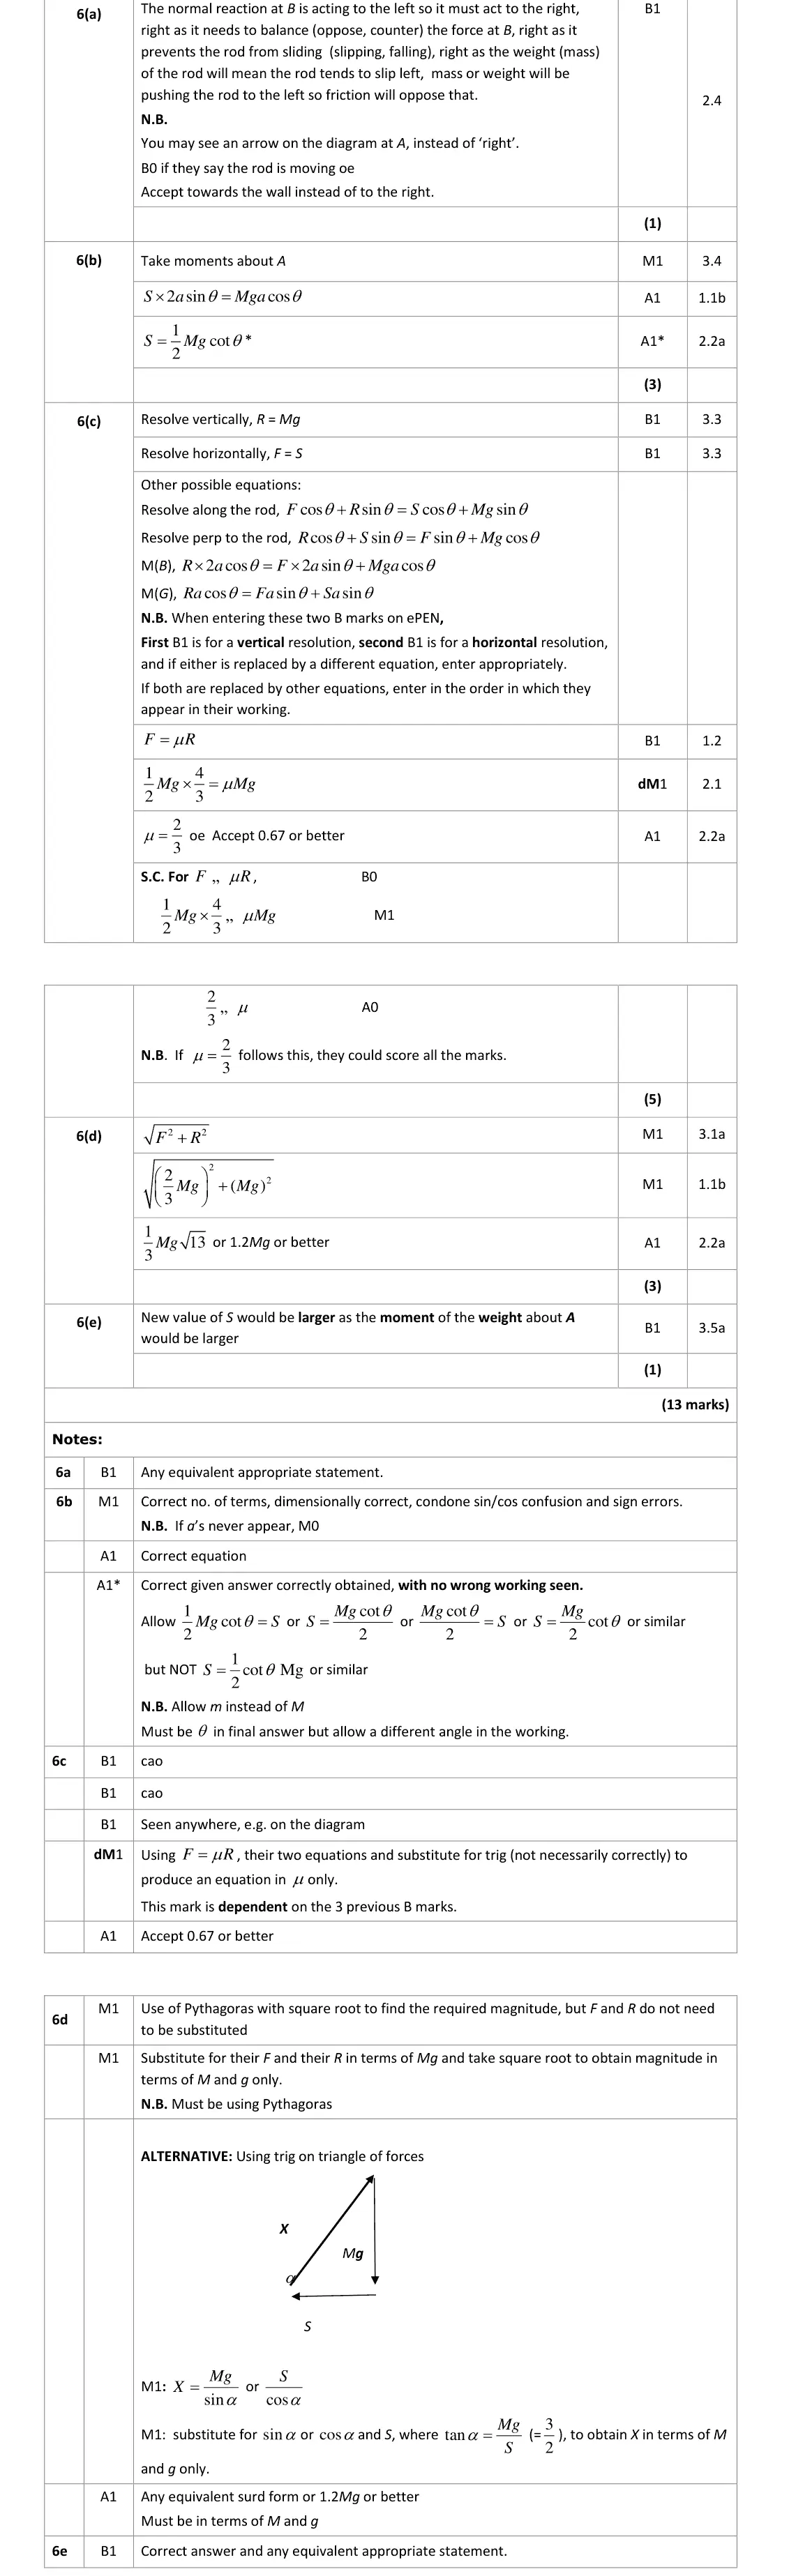
In part (b) the most popular and simplest approach was to take moments about A to derive the given expression for the normal reaction at B. The angle was given between the vertical and the rod, rather than the possibly more familiar case of between the horizontal plane and the rod. Although this was not a problem for the vast majority, a significant number used (90o - alpha ) for their angle which sometimes led to confusion, particularly for those who did not recognise the equivalence with sin alpha /cos alpha and instead tried to use the addition formula to write this in terms of alpha only. In addition to sin/cos confusion, errors seen included total omission or inconsistent inclusion of a, slips in copying from one line to the next and occasional omission of the weight of the rod. Since the requirement was to ‘show that tan S Mg ’ it was essential that working was complete and correct to achieve all the alpha = marks. A very small minority attempted to take moments about B but they often did not complete their solution by resolving forces in order to eliminate F and R. In the third part although many learners recognised that R (with no friction acting at B) was take moments about A, to follow from the work in part (b). Responses that did this usually scored some marks for their horizontal and/or vertical resolutions even if their moments equation was incorrect. Occasionally the reaction at the wall was considered to be perpendicular to the rod rather than to the wall which generally resulted in no marks being achieved. Errors in the moments equation included sin/cos confusion, inconsistent inclusion of a and incorrect perpendicular distances. Some omitted the weight of the rod leading to a missing term in both the moments equation and the vertical resolution. Fragmented respondes, simplifying terms before writing down a full moments equation, sometimes made slips in the process. Those who attempted to take moments about B often achieved the mark for their vertical resolution but often did not gain all the marks for their moments equation. Attempts to resolve parallel or perpendicular to the rod were rare and tended to have a term missing. Nevertheless, there were a fair number of entirely correct solutions seen with clear and concise working.
Common mistakes
moments about A: S × 2a cos α = Mga sin α + 2Mg × 0.5a sin α
angle is with the wall, not the ground (using 90° − α causes errors)
sin/cos confusion
inconsistent a
at least one line of working before the given answer
June 2025 · Paper 3 (Mechanics) · Q6(c)1 mark
Mark scheme (whole question; this part is marked with the orange bar)
Examiner's comment
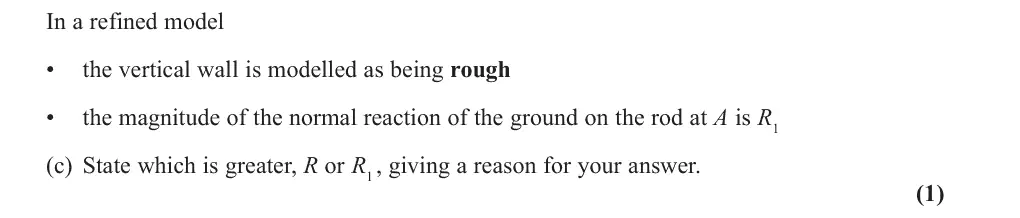
In the third part although many learners recognised that R (with no friction acting at B) was greater than R1 (with friction acting at B), the explanations were not always clear. Those who 3 R Mg used equations generally performed better and gained the mark e.g. and = 3 so R is greater. Some learners thought that the frictional force would act R Mg F = - 1 downwards concluding that R1 was greater whilst others either just stated ‘because of friction’ or did not state that friction acted upwards (or in the same direction as R1).
Common mistakes
friction at a rough wall acts upward, so R1 + F = 3Mg and R is greater
"because of friction" alone or friction acting downward scores nothing
June 2025 · Paper 3 (Mechanics) · Q6(d)6 marks
Mark scheme (whole question; this part is marked with the orange bar)
Examiner's comment
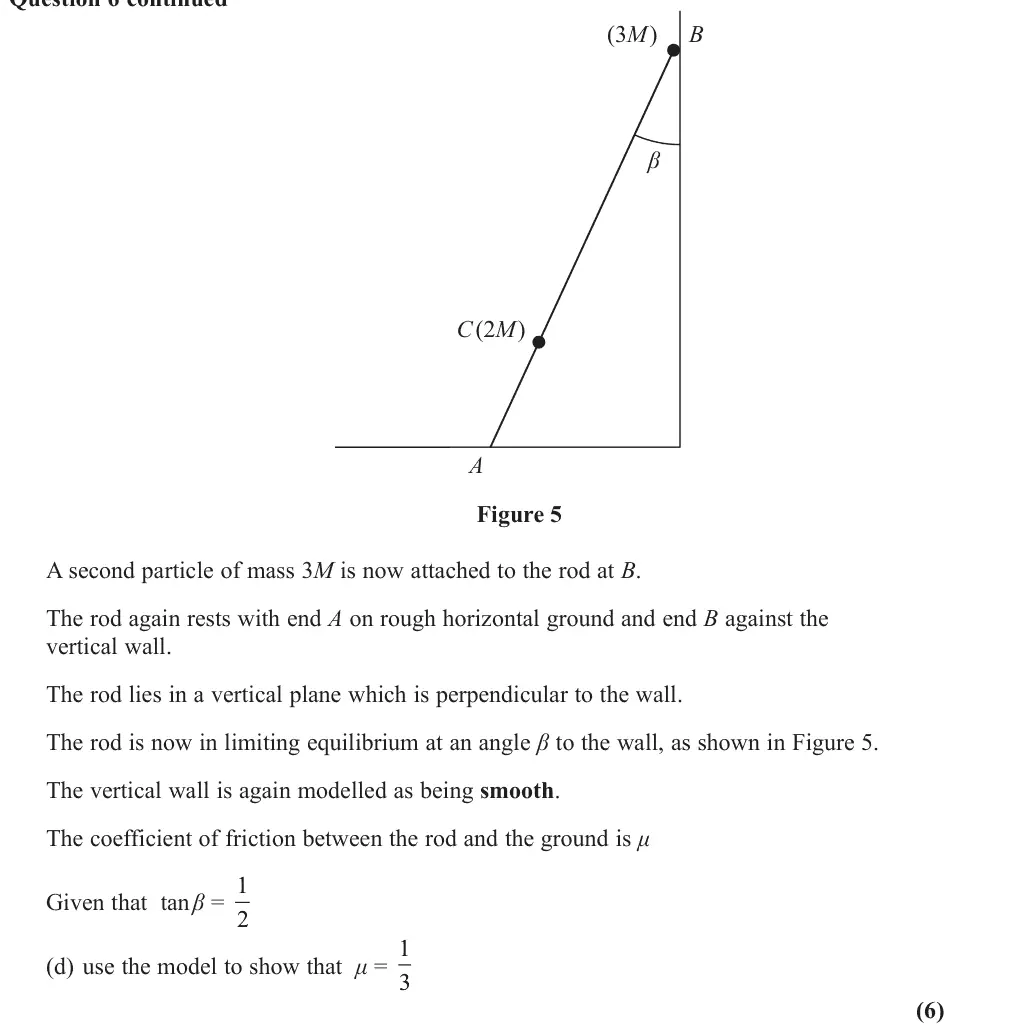
Part (d) was the most challenging part of the question. It was often left blank or multiple half- finished attempts were seen with little clear structure. The most common approach was to take moments about A, to follow from the work in part (b). Responses that did this usually
Common mistakes
include the 3M particle at B: N = 6Mg (not R from (a))
moments about A give the wall reaction P = 2Mg = F
limiting equilibrium so F = μN
reaction at the wall is perpendicular to the wall, not the rod
omitting the rod's weight
incorrect perpendicular distances
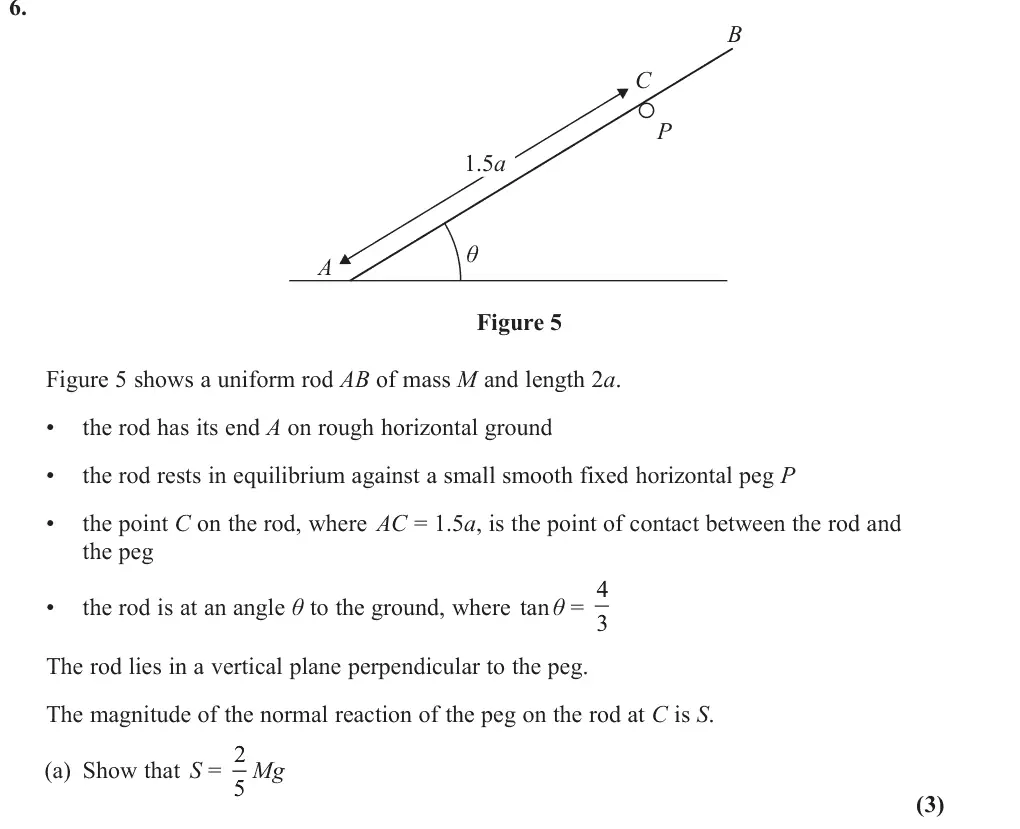
June 2024 · Paper 3 (Mechanics) · Q6(a)3 marks
Mark scheme (whole question; this part is marked with the orange bar)
Examiner's comment
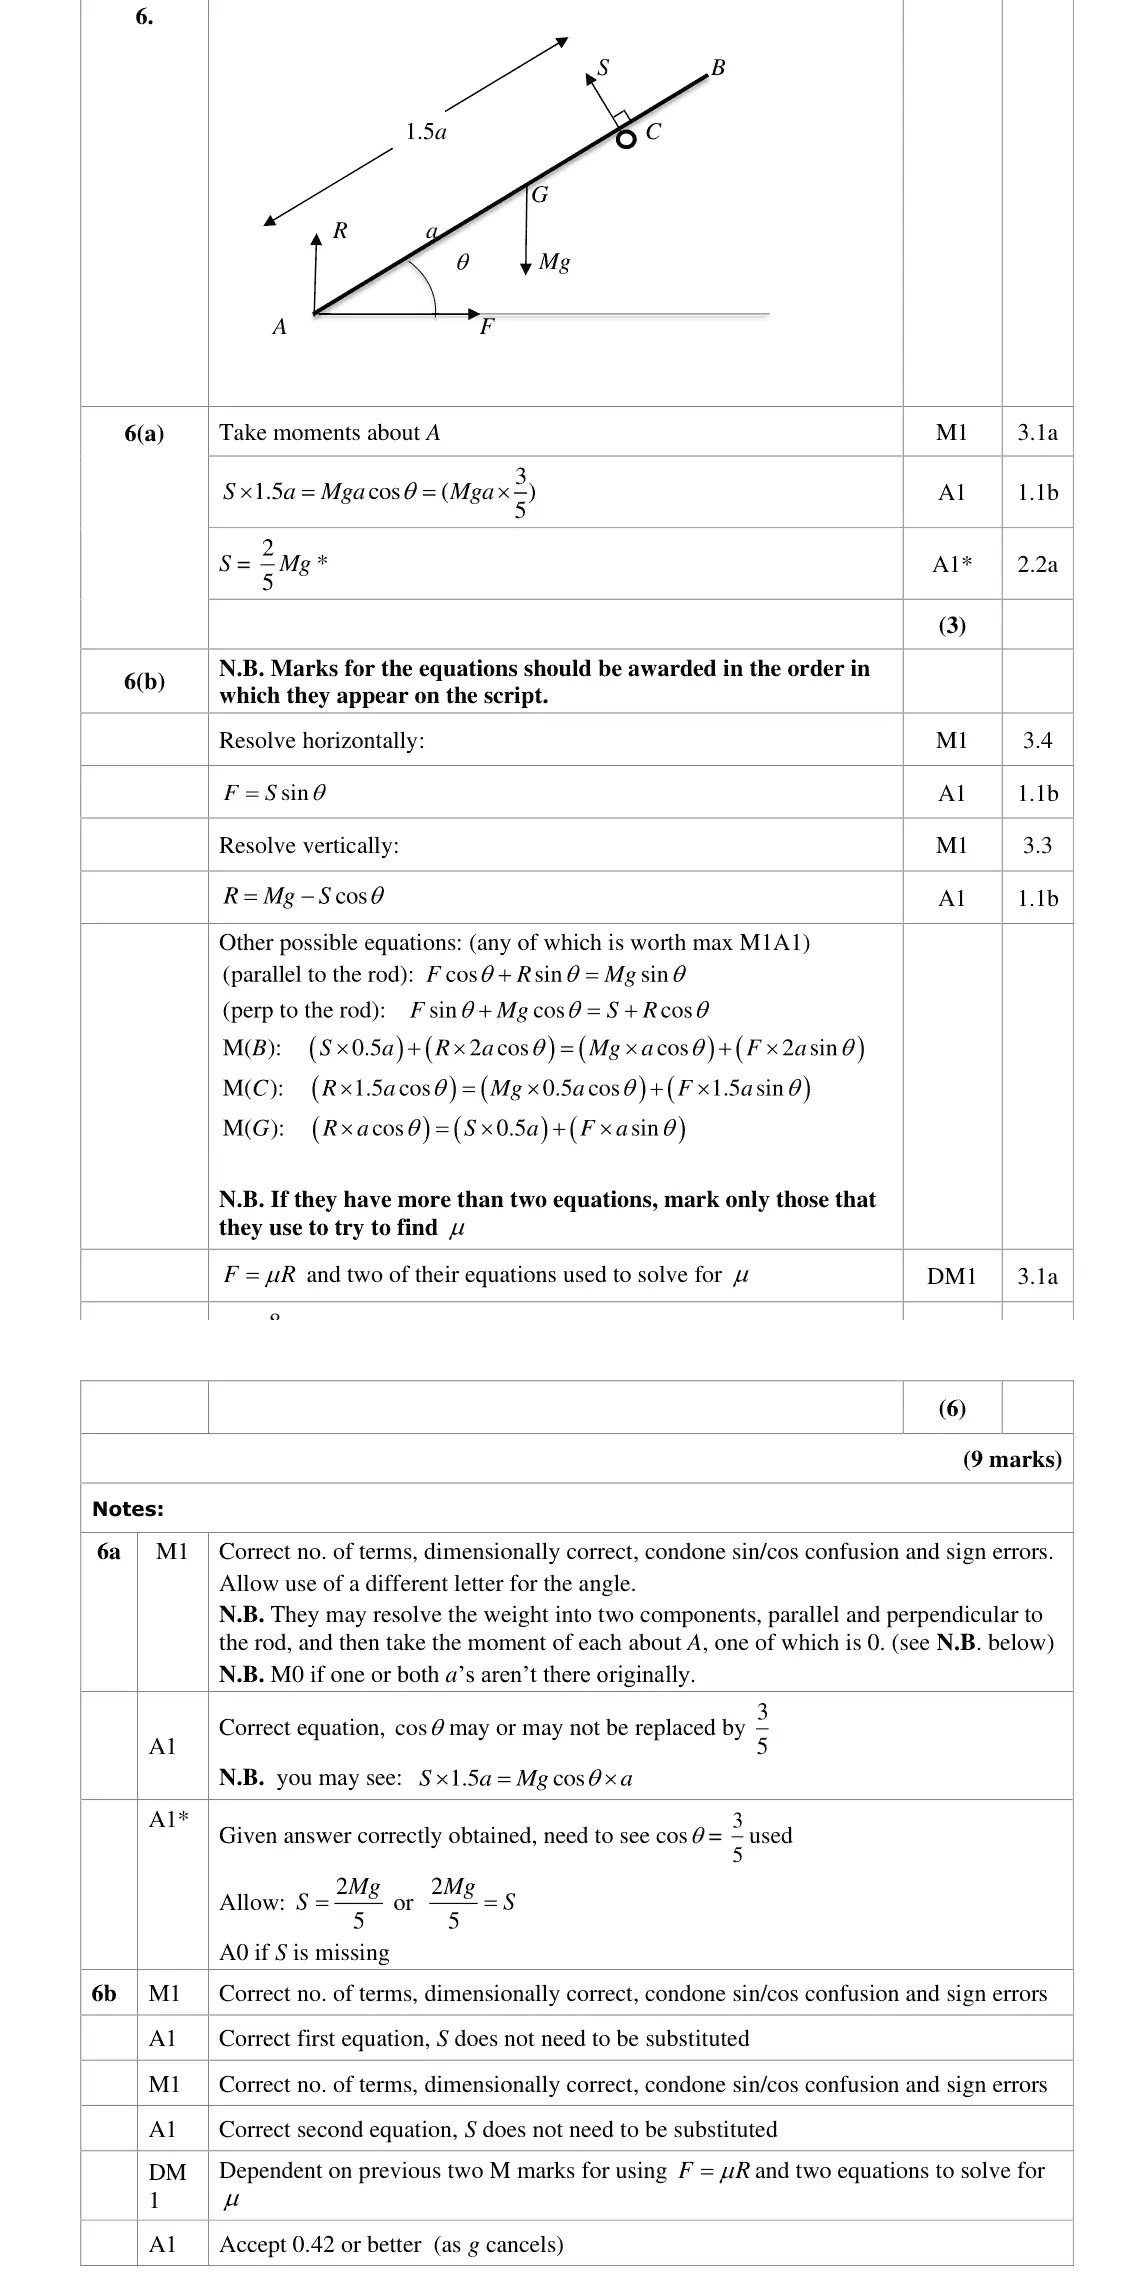
(a) There were a good number of fully correct responses to this ‘Show that’ question. The majority of candidates found and used the trig ratios successfully, possibly because the answer was given in the question, which allowed them to identify whether they had calculated or used the wrong one. If a candidate gained one or two marks, but not all three, it was usually due to sin/cos confusion or making arithmetic errors when rearranging the equation. Some candidates lost all the marks because they omitted the a’s and so did not have a moments equation, but most included these initially and then cancelled appropriately. The final mark was occasionally lost because explicit use of 3 = was not seen or the candidate chose to give the force another name (such as RC) cos 5 and so did not arrive at the printed answer. A common error was using 2a instead of 1.5a as the distance. A few candidates gave the impression of having arrived at the required answer, but on closer inspection were not correct in their work. The most common 2 = = 0.5 sin S Mg Mg example of incorrect working was . Some tried to formulate a 5 proof based on the given answer that did not involve taking moments, but instead tried to resolve forces, and received no credit. Most candidates presented their answer in the given form, although S on the RHS was occasionally seen.
Common mistakes
moments about A: S × 1.5a = Mg × a cos θ with cos θ = 3/5
using 2a instead of 1.5a or a for the weight
missing the a's (not a moment)
resolving instead of moments scores nothing
June 2024 · Paper 3 (Mechanics) · Q6(b)6 marks
Mark scheme (whole question; this part is marked with the orange bar)
Examiner's comment
(b) Many candidates scored all six marks in this part. Resolving vertically and horizontally was the most common and the most successful method. There were few errors apart from sin and cos confusion. Taking moments about C to give an equation in R and F and then resolving was the next most common method, but candidates were more likely to make errors using this approach, either by confusing sin with cos or by omitting a force entirely. Very few candidates resolved parallel and perpendicular to the rod and most of those who used this method failed to arrive at the correct answer due to the more challenging algebra. Occasionally candidates wrote dimensionally inconsistent equations by failing to include lengths in all of their moment terms or, more rarely, erroneously including lengths in their force terms. Errors included missing a g where there should have been one or not having the correct number of terms in a moment or a resolution equation. A surprisingly common error was for students to confuse the reaction force S 2 = F Mg with the reaction force at A, resulting in the incorrect equation Some 5 candidates lost method marks by resolving forces that did not need resolving (for and ). Whichever method Mg sin example, by writing an equation with both cos S was used, early substitution for F into their solutions was often seen, with almost all candidates realising that they needed to use F = μR. Some candidates clearly still incorrectly believe that μ cannot be greater than 1 and were ‘dismissive’ when their value was. It was not uncommon to see very messy responses, with multiple attempts and work crossed out. Many candidates made a good attempt at solving for mu , but this was often impeded by the lack of clarity over the previous equations. The mark scheme enabled candidates who used a correct method but who made sign errors, confused sin and cos or used incorrect distances to score half marks (generally, M1A0M1A0M1A0), while those with more fundamental misunderstandings were prevented from accessing the dependent method mark; this seemed to sort out the candidates well. When mu was found, most candidates gave the answer as a fraction or to an appropriate degree of accuracy.
Common mistakes
resolve horizontally F = S sin θ and vertically R = Mg − S cos θ, then F = μR: μ = 8/19 ≈ 0.42
confusing S with the reaction at A
sin/cos confusion
resolving forces that need no resolving
μ may be greater than 1 in general
June 2023 · Paper 3 (Mechanics) · Q6(b)3 marks
Mark scheme (whole question; this part is marked with the orange bar)
Examiner's comment
number thought that the direction was left or gave no reason at all. In part (b), the question directed the candidates to take moments about A and most were able to do so successfully with many achieving the three available marks. The occasional incorrect response had the distance to the reaction at B unresolved as 2a. Also a small number had a’s missing from both sides of their equation. Since this was a “show that” question it was important that all stages of the solution were shown and were correct. It should be noted that the candidate’s final answer had to be written exactly as the printed answer, using the same symbols in the same order, to achieve the final mark. Part (c) required a calculation of the
Common mistakes
S × 2a sin θ = Mg × a cos θ
perpendicular distance of S from A is 2a sin θ, not 2a
final answer exactly as printed
June 2023 · Paper 3 (Mechanics) · Q6(e)1 mark
Mark scheme (whole question; this part is marked with the orange bar)
Examiner's comment
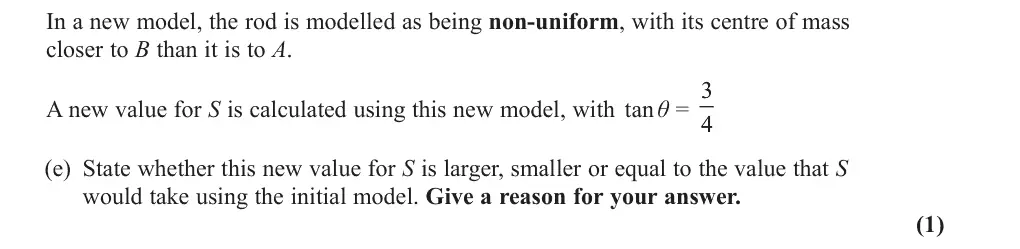
the simplification in terms of mg in an otherwise correct solution. In the final part, the majority of candidates were unable to gain the mark often because of lack of precision in the wording of their response. Many stated that S was larger because the weight was closer to B or it exerted more force/pressure at B. Some who did refer to an increased moment about A failed to specify it as the moment of the weight. Some mentioned distance but did not explicitly refer to moments. Candidates who used their moments equation to show that a distance of the weight from A greater than a led to a larger value of S were generally successful. A small number thought S was smaller or did not change.
Common mistakes
S is larger because the moment of the weight about A is larger
must refer to the moment of the weight, not just "closer to B" or more force at B
June 2022 · Paper 3 (Mechanics) · Q4(b)3 marks
Mark scheme (whole question; this part is marked with the orange bar)
Examiner's comment
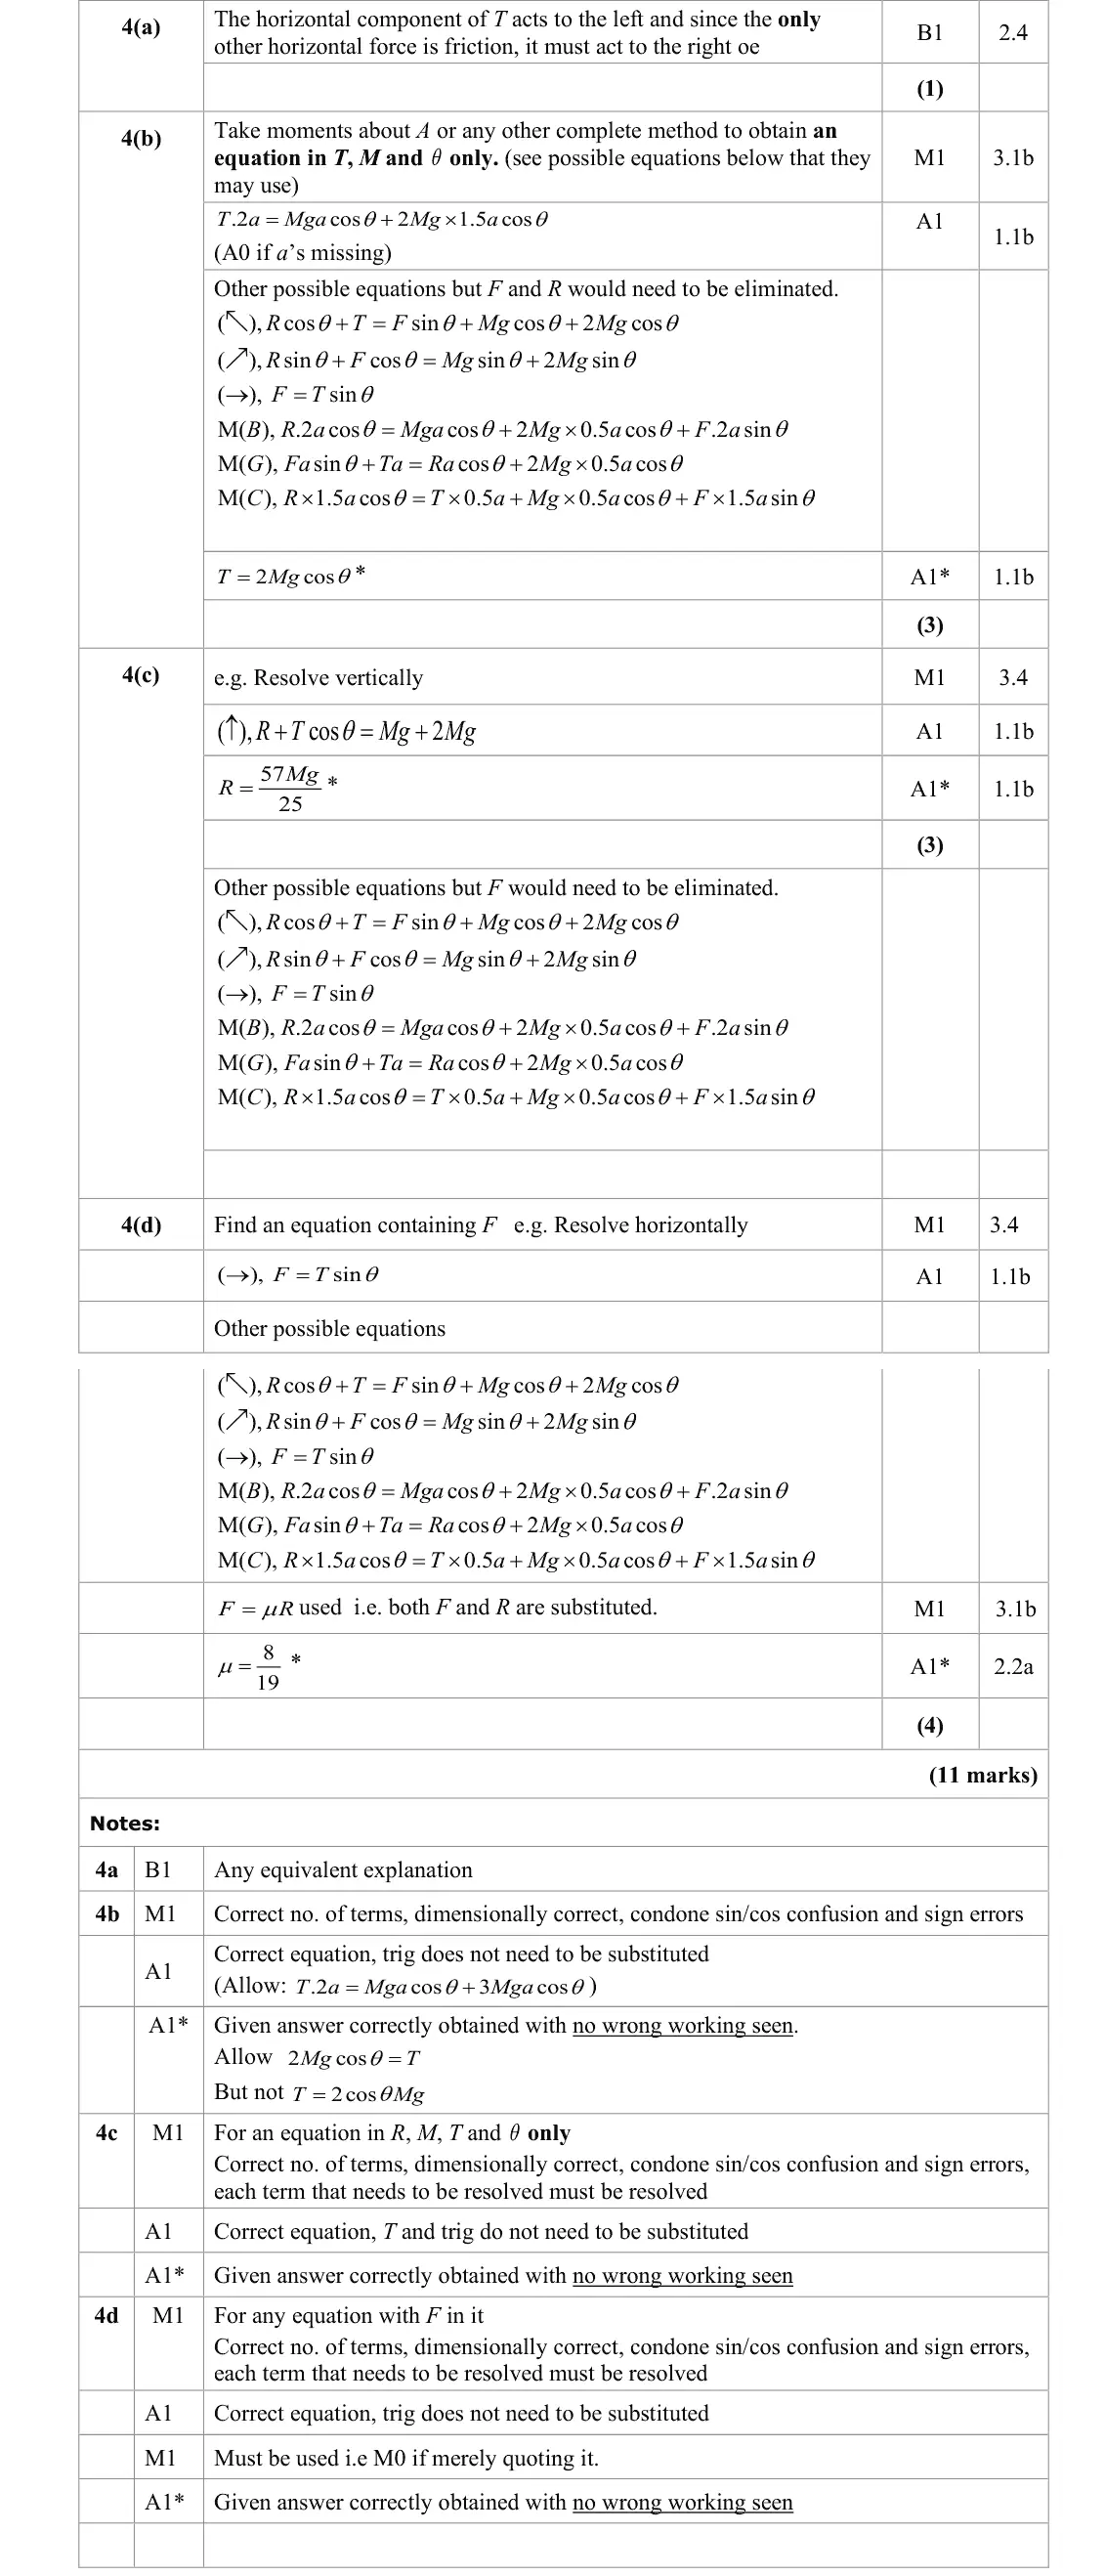
In the second part, it was required to derive a given expression for T (tension). Although some candidates struggled to make a valid start and basically just wrote down the answer and stated ’by resolving ’, it was well done by a fair number who set up a correct equation for moments about A and hence deduced the given result. Alternative approaches by either taking moments about other points or resolving forces were very rare and almost never successful, mostly because of missing terms. A few candidates failed to use perpendicular distances for the moments of the weight terms or failed to include the weight of the rod leading to a missing term. Part (c) was generally well answered by those candidates who
Common mistakes
take moments about A to avoid F and R: T × 2a = Mga cos θ + 2Mg × 1.5a cos θ
use perpendicular distances
include the rod's own weight
just quoting the result "by resolving" scores nothing
Oct 2021 · Paper 3 (Mechanics) · Q3(a)5 marks
Mark scheme (whole question; this part is marked with the orange bar)
Examiner's comment
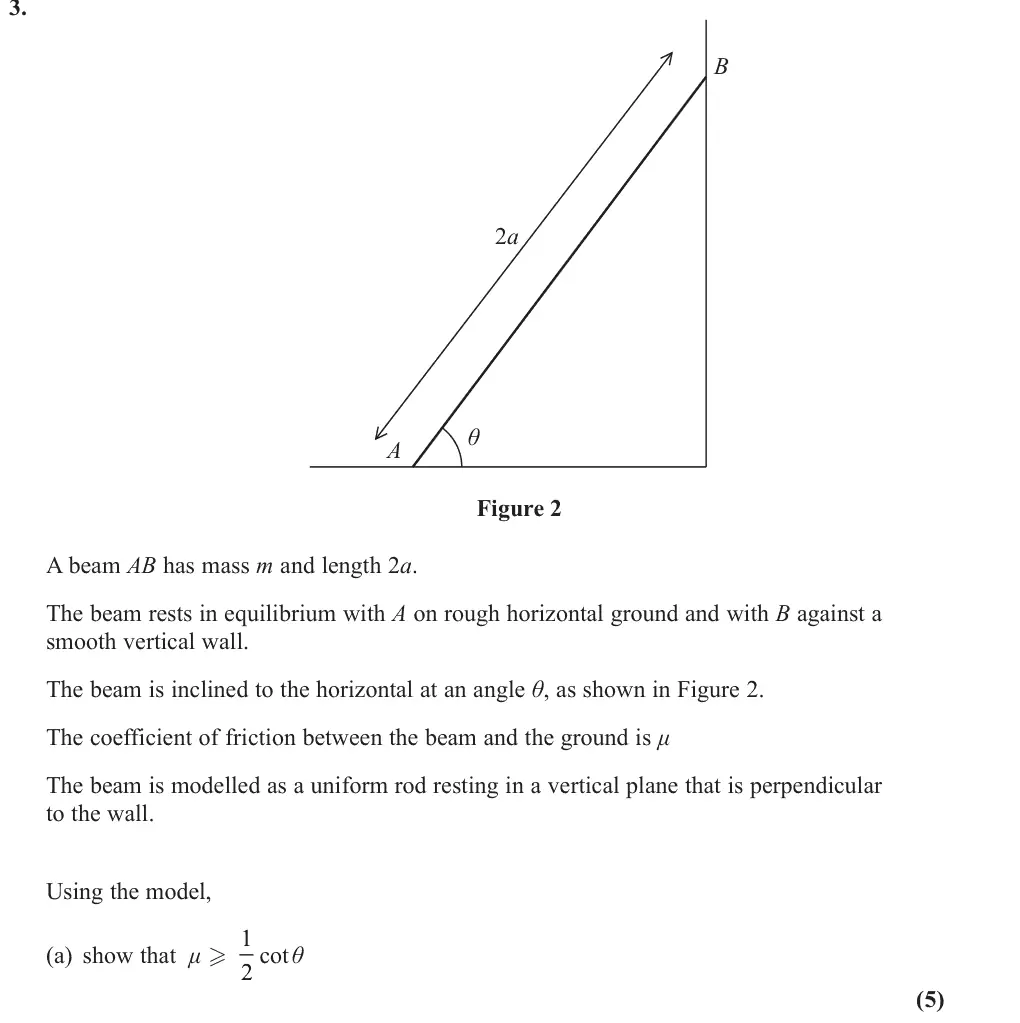
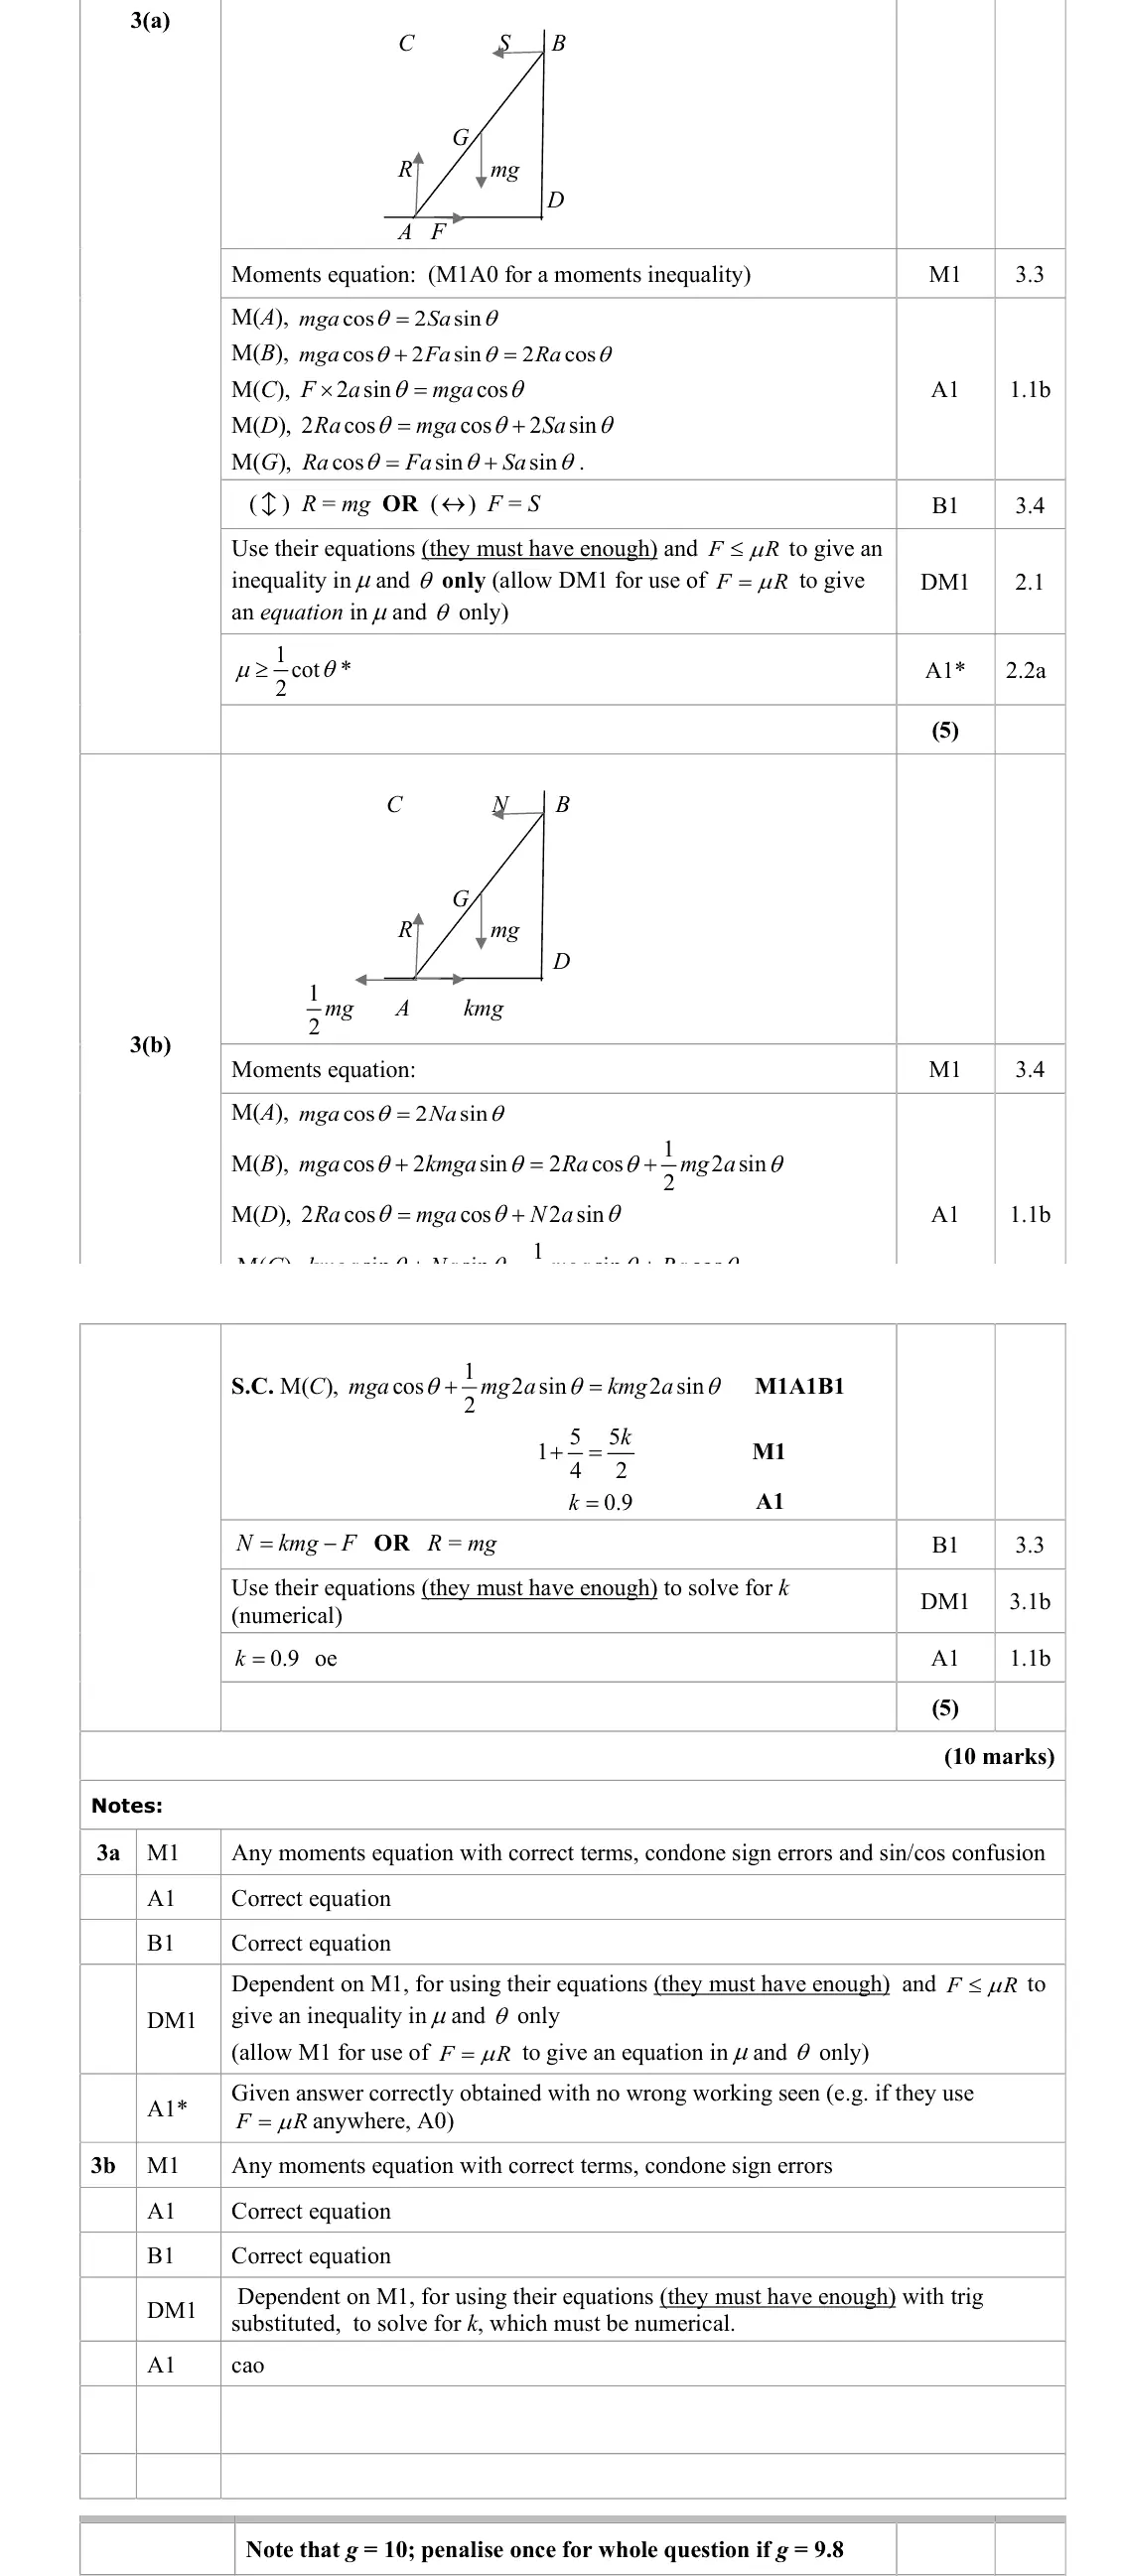
Part (a) required candidates “ To show that…”. Consequently, full marks were only awarded if there was a fully correct solution, with all the steps included. Thus successful candidates needed one moments equation together with a vertical resolution and/or a horizontal resolution, depending on which point they had used for their moments equation. These equations, combined with F , could then lead to full marks being R mu <= earned. Many candidates assumed that the beam was in limiting equilibrium i.e. that , produced an equation and then changed it to the required inequality. These F R mu = candidates lost the final mark. Other errors included omission of g, sin/cos confusion in moments equations and assuming that the reaction at A and the reaction at B were the same. Candidates tended to be more successful in part (b), where a similar strategy was
Common mistakes
one moments equation (e.g. about A: mga cos θ = 2Sa sin θ) plus resolving R = mg, F = S
use F ≤ μR to get the inequality (assuming limiting F = μR and then switching to ≥ loses the final mark)
omitting g
sin/cos confusion
reactions at A and B are not equal
Oct 2021 · Paper 3 (Mechanics) · Q3(b)5 marks
Mark scheme (whole question; this part is marked with the orange bar)
Examiner's comment
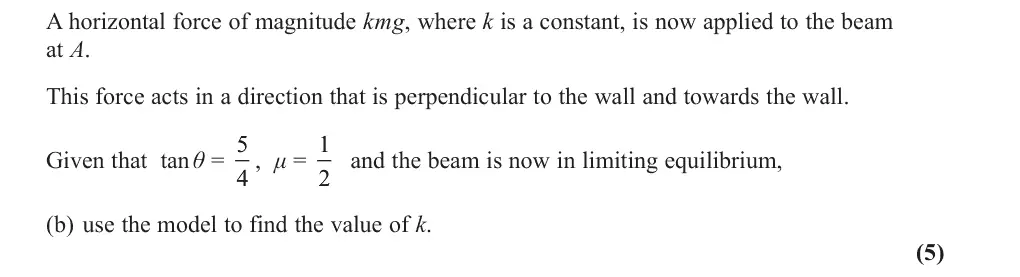
same. Candidates tended to be more successful in part (b), where a similar strategy was required, together with F , since the beam was now in limiting equilibrium. A R = mu common error was to have the friction force acting towards the wall. This lead to a k value of – 0.1 and the negative sign should have flagged up an error to candidates.
Common mistakes
limiting so F = μR = ½mg
friction now acts away from the wall (friction towards the wall gives k = −0.1, a negative k should flag the error)
moments equation plus horizontal resolution N = kmg − F
k = 0.9
Oct 2020 · Paper 3 (Mechanics) · Q4(a)3 marks
Mark scheme (whole question; this part is marked with the orange bar)
Examiner's comment
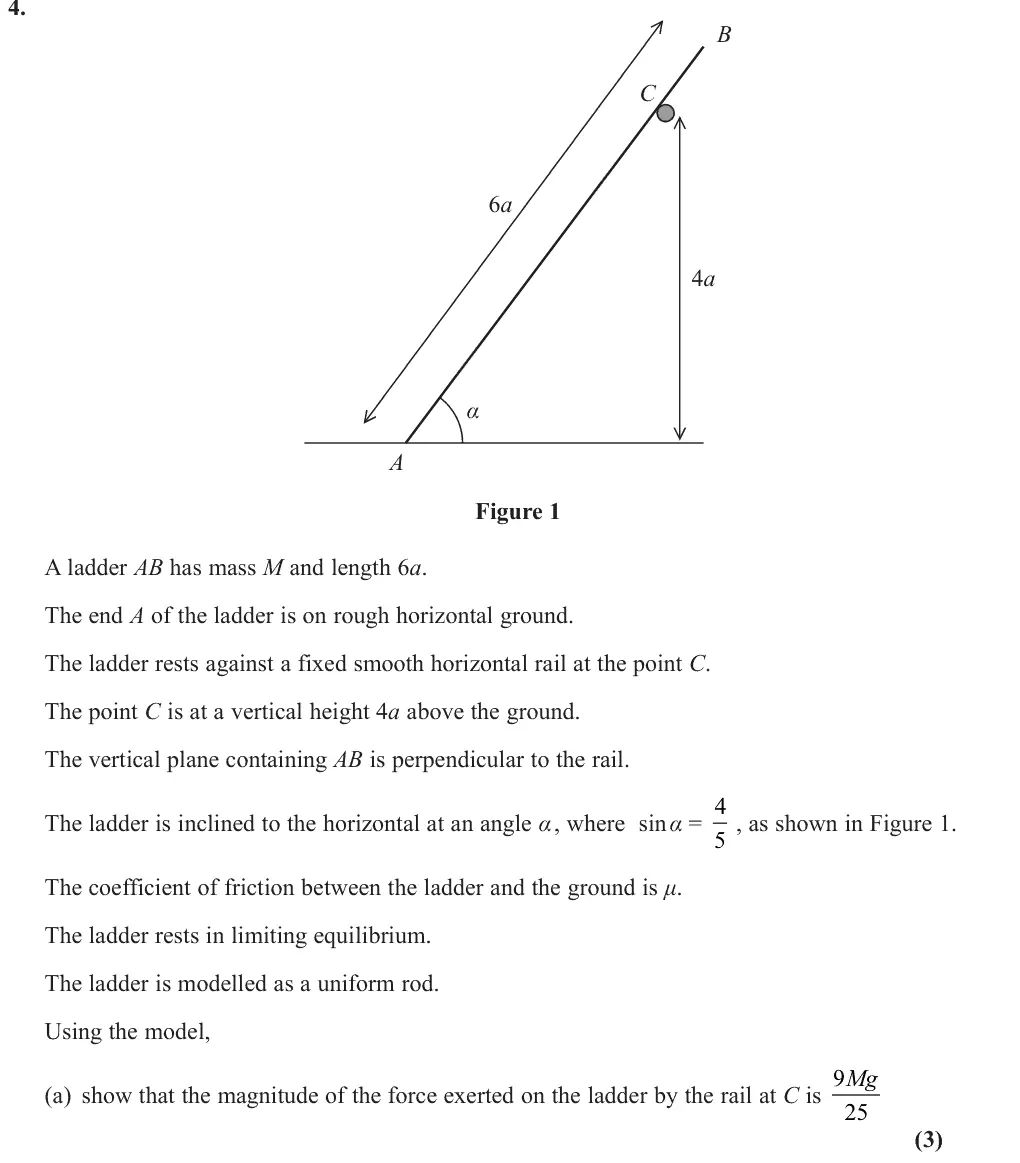
A significant number of candidates made little or no progress with this question; a number of responses showed a complete lack of understanding of the nature and directions of the forces acting on the ladder. In part (a) a fair number attempted to take moments about A to derive the given reaction at C although sometimes perpendicular distances were not used and this invalidated the method. The most straightforward approach for part (b) was
Common mistakes
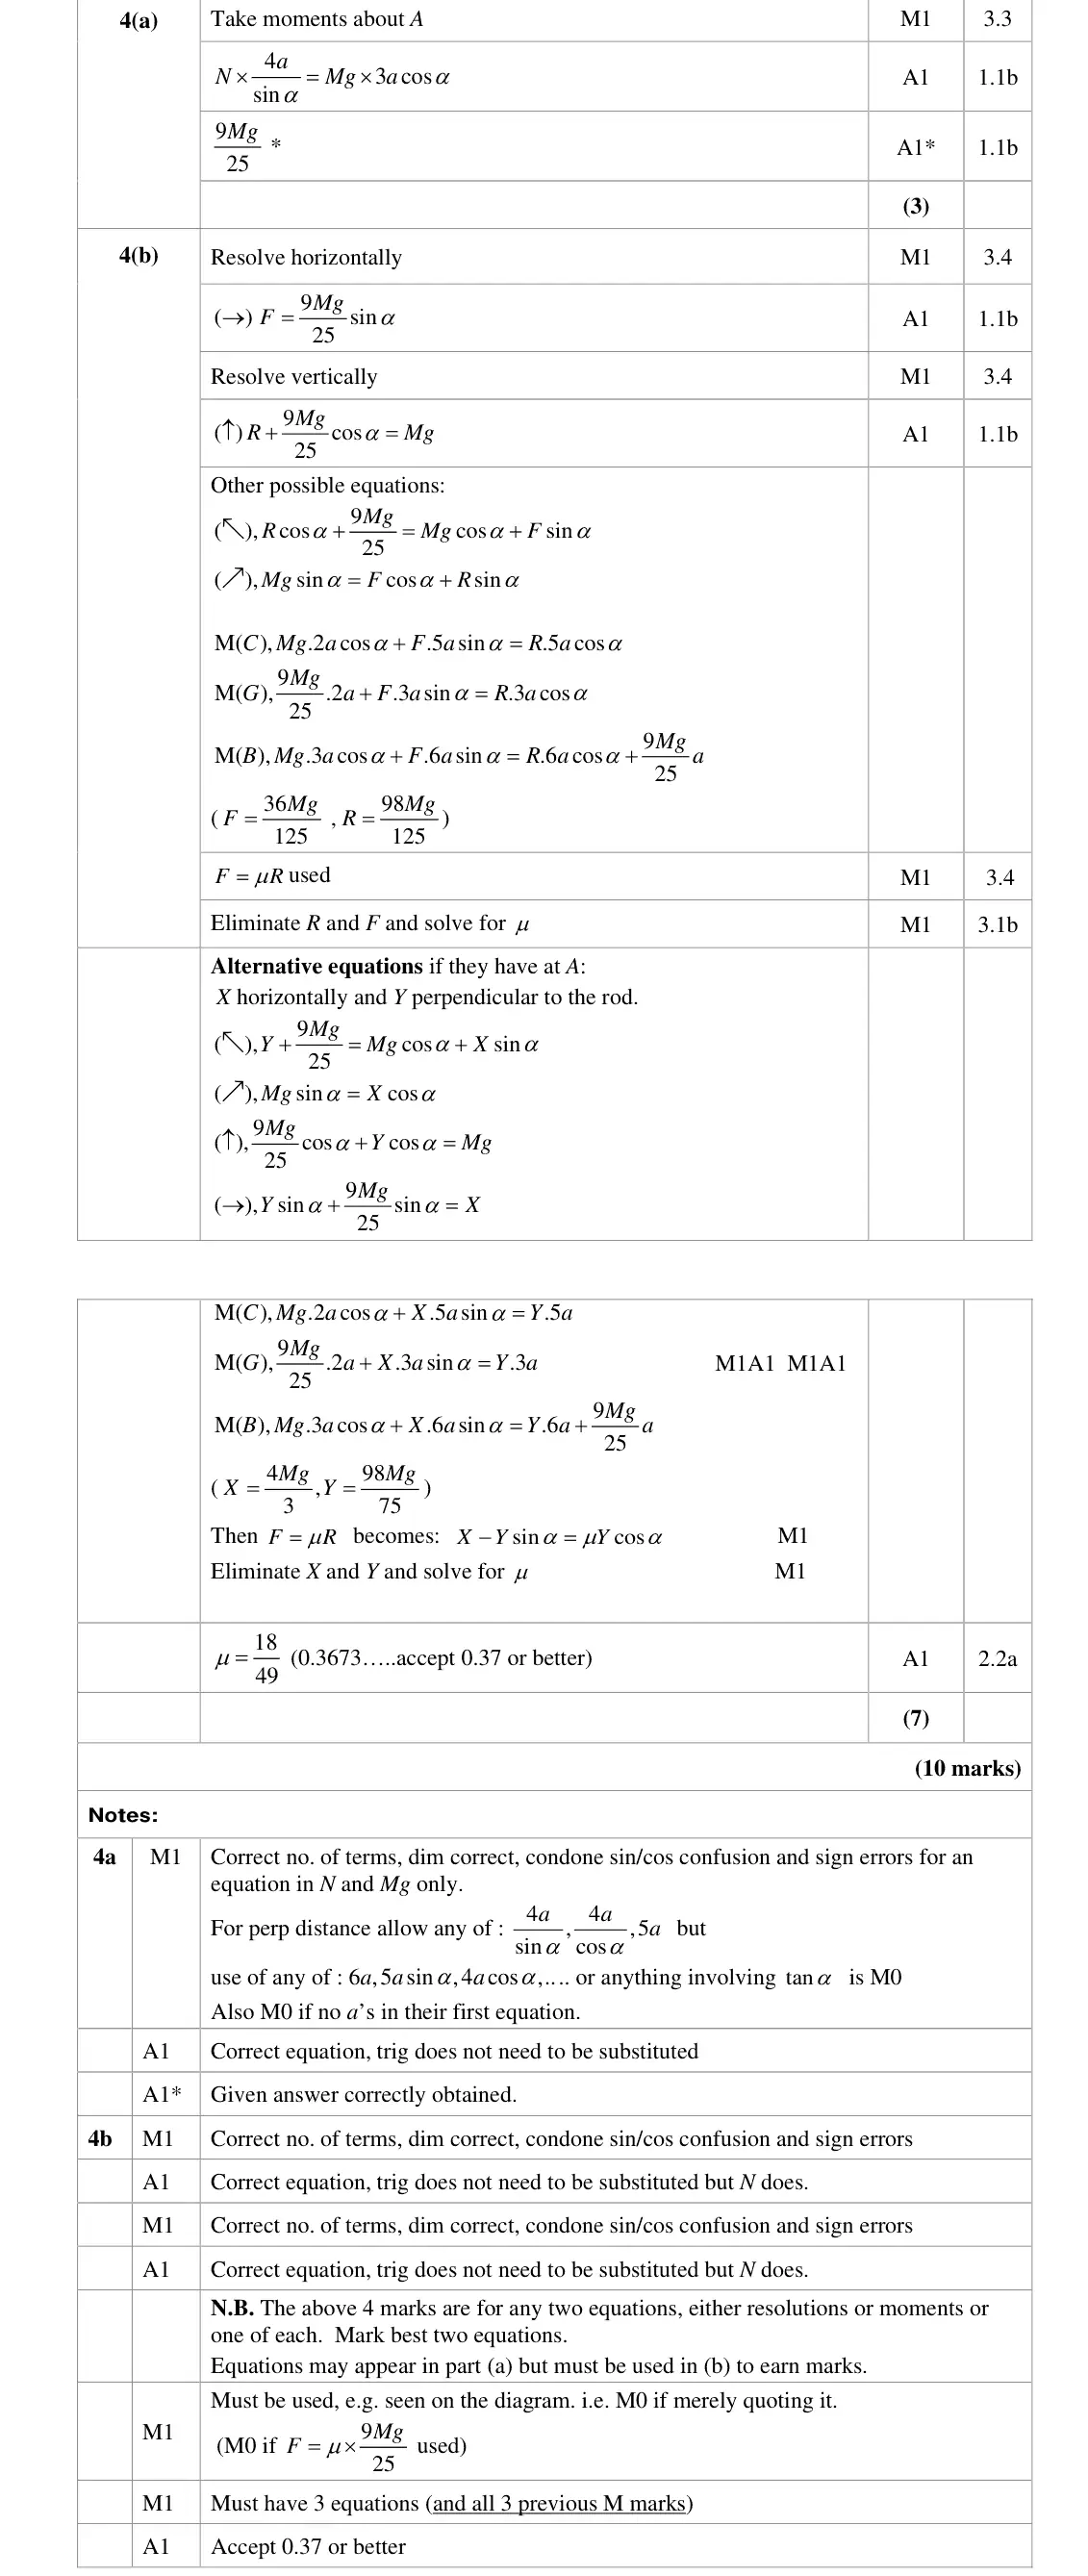
moments about A with perpendicular distances: N × 4a/sin α = Mg × 3a cos α
AC = 5a, not 6a
reaction at the smooth rail is perpendicular to the ladder
Oct 2020 · Paper 3 (Mechanics) · Q4(b)7 marks
Mark scheme (whole question; this part is marked with the orange bar)
Examiner's comment
A significant number of candidates made little or no progress with this question; a number of responses showed a complete lack of understanding of the nature and directions of the used and this invalidated the method. The most straightforward approach for part (b) was to resolve horizontally and vertically. Some candidates chose to take moments about various points or to resolve perpendicular and/or parallel to the ladder. These methods often led to errors including missing terms and incorrect distances. Some thought the normal reaction at C was horizontal. Those who attempted to use a reaction perpendicular to the ladder generally used this in F= mu R and were unaware that this is only valid for a normal reaction. Confusion between sin/cos in resolving the reaction at C horizontally and vertically was surprisingly common. There were, nevertheless, some well-expressed fully correct solutions seen.
Common mistakes
resolve horizontally F = (9Mg/25) sin α and vertically R + (9Mg/25) cos α = Mg
the reaction at C is perpendicular to the ladder, not horizontal
F = μR only with the normal reaction at A (not 9Mg/25)
sin/cos confusion
μ = 18/49 ≈ 0.37
June 2019 · Paper 3 (Mechanics) · Q4(a)1 mark
Mark scheme (whole question; this part is marked with the orange bar)
Examiner's comment
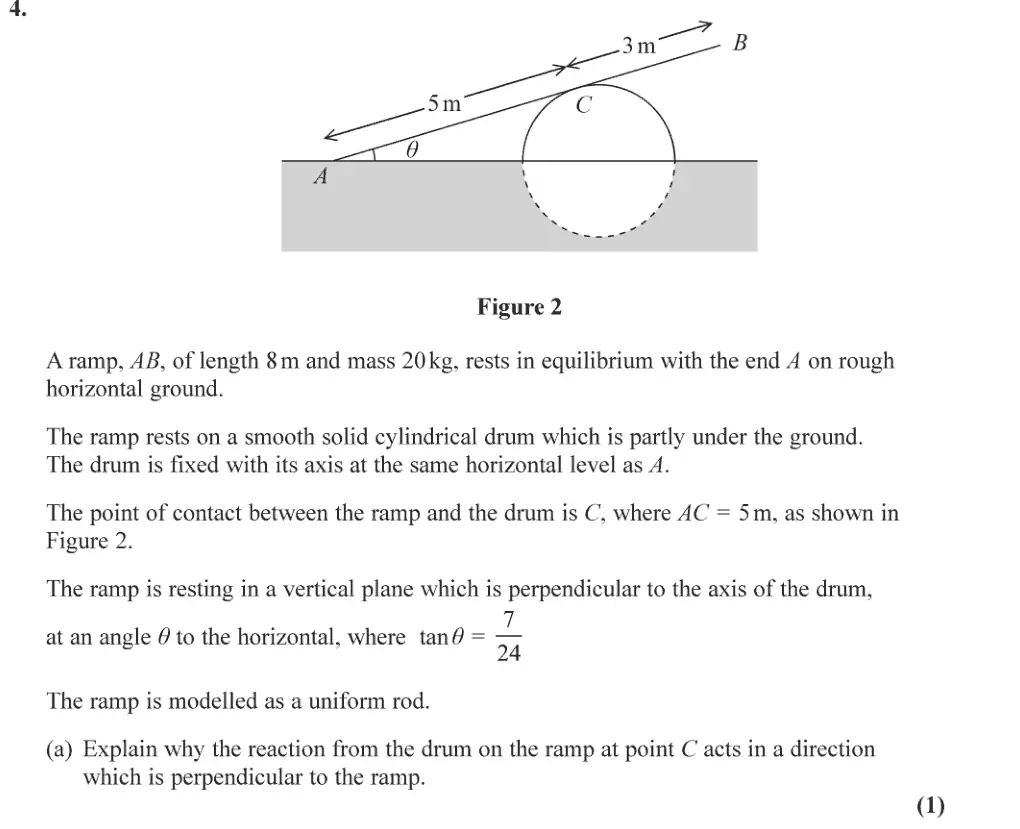
In part (a), the majority of candidates either produced a geometric reason for the reaction acting perpendicular to the ramp (such as the ramp being tangential to the circular drum) or gave an argument about action being equal and opposite to reaction. Many seemed to think that a reaction is, by definition, at right angles to the surface. Very few recognised the significance of the drum being smooth with the consequence that there is no frictional force and hence only a normal component of the reaction. The second part involved finding the components of the resultant force on the ramp at the point of contact
Common mistakes
the drum is smooth so there is no friction at C
"tangent to the circle" or "action and reaction" alone is not the reason
June 2019 · Paper 3 (Mechanics) · Q4(b)9 marks
Mark scheme (whole question; this part is marked with the orange bar)
Examiner's comment
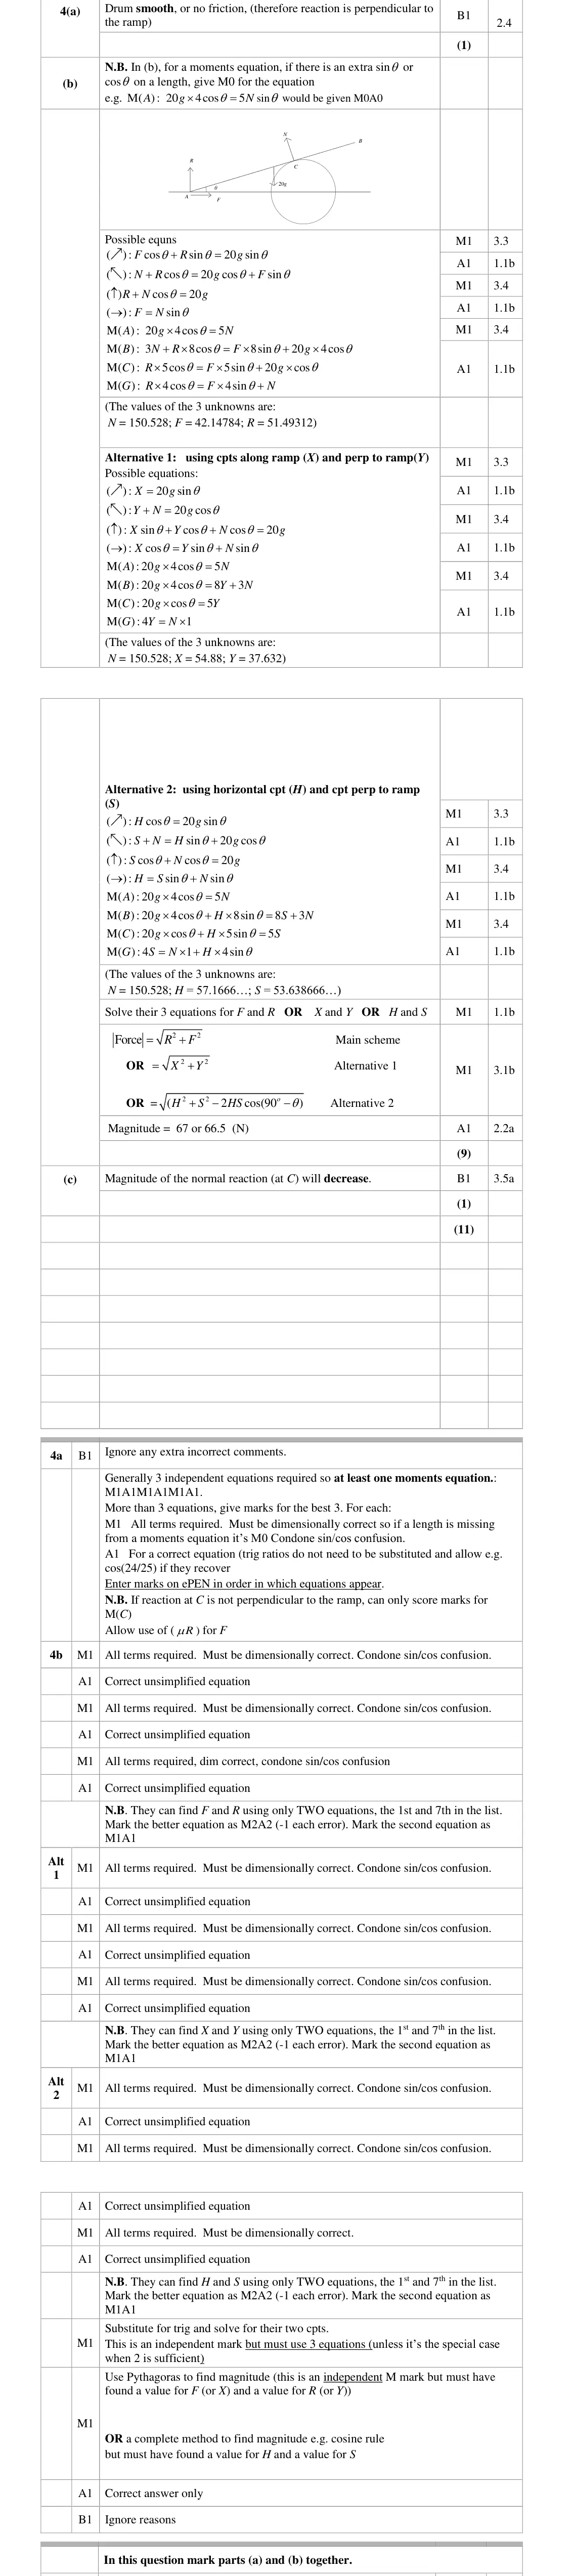
second part involved finding the components of the resultant force on the ramp at the point of contact with the ground and hence its magnitude. This proved challenging for many and some made little valid progress. A clearly labelled diagram would have helped to identify forces and distances. Most used a normal reaction and a horizontal frictional force at A; however, the latter was sometimes omitted which significantly reduced the number of marks available for subsequent equations. Some employed components parallel and perpendicular to the ramp; such attempts were rare but generally successful. A variety of resolution and moments equations were attempted but sometimes components were omitted, forces not resolved or perpendicular distances not used. Working was often difficult to decipher. Those who attempted vertical and horizontal resolutions and a ‘moments about A’ equation tended to be the more successful although a significant number stopped when they had found the normal reaction only. Some introduced a coefficient of friction which was not necessary to answer the question (even giving it the value 2 from the previous question). Occasionally those who completed a correct solution by 3 squaring and adding components to find the magnitude of the resultant failed to achieve the final accuracy mark for not rounding to 2 or 3 significant figures following the use of g = 9.8 m s-2. Some who had achieved very few marks for the rest of the question managed to secure the mark in part (c)
Common mistakes
friction at A is horizontal and must be included
at least one moments equation (e.g. M(A): 20g × 4cos θ = 5N) with perpendicular distances
three equations then magnitude √(F² + R²) ≈ 67 N (2 or 3 s.f. after g = 9.8)
μ is not needed
stopping at R
June 2019 · Paper 3 (Mechanics) · Q4(c)1 mark
Mark scheme (whole question; this part is marked with the orange bar)
Examiner's comment
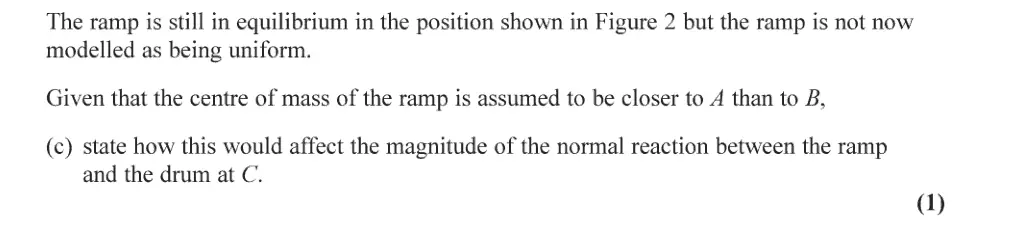
who had achieved very few marks for the rest of the question managed to secure the mark in part (c) for stating that the reaction at C decreases if the centre of mass is assumed to be closer to A than to B. No reason was required although some chose to give one. A minority claimed it increased or remained unchanged (although the explanation sometimes implied that candidates were considering the reaction at A rather than at C).
Common mistakes
reaction at C decreases (moments about A)
confusing the reaction at C with the reaction at A
June 2018 · Paper 3 · Q9(a)3 marks
Mark scheme (whole question; this part is marked with the orange bar)
Examiner's comment
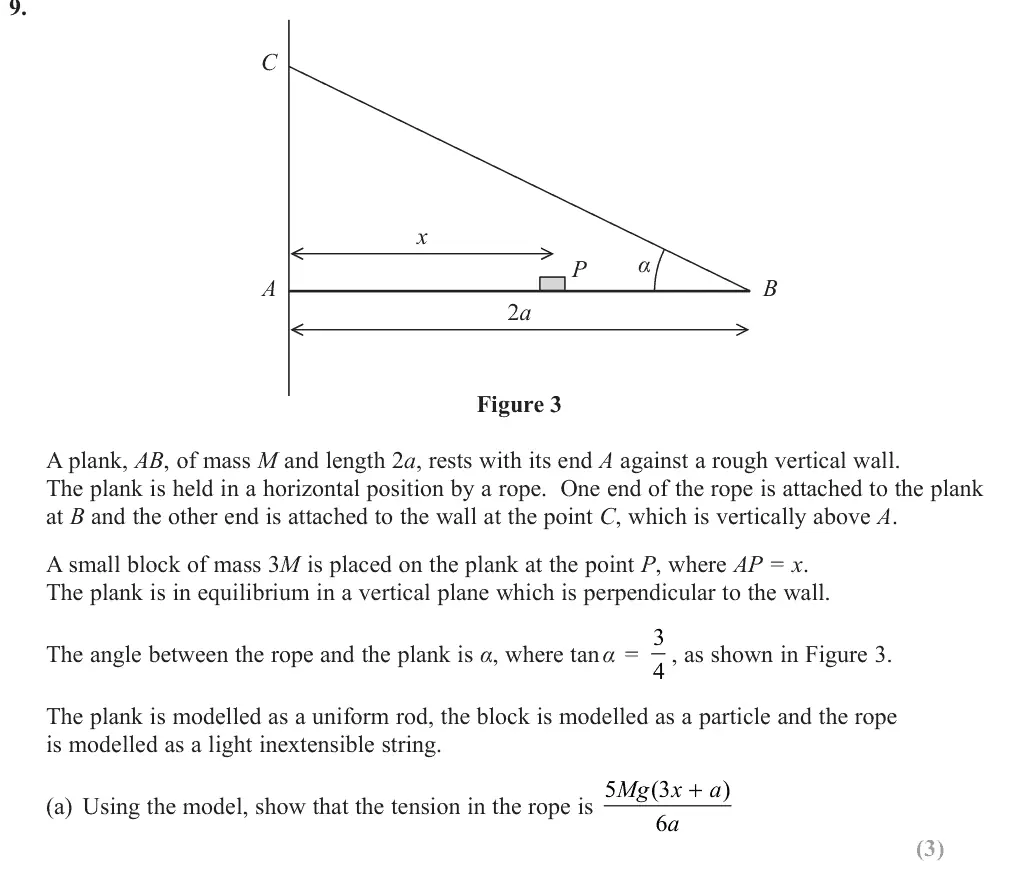
In part (a), most students used a ‘moments about A’ equation to deduce the given expression for the tension in the rope. Since the answer was given it was important that the preceding working was sufficient and accurate but generally this was well done. In part (b), most used a horizontal resolution
Common mistakes
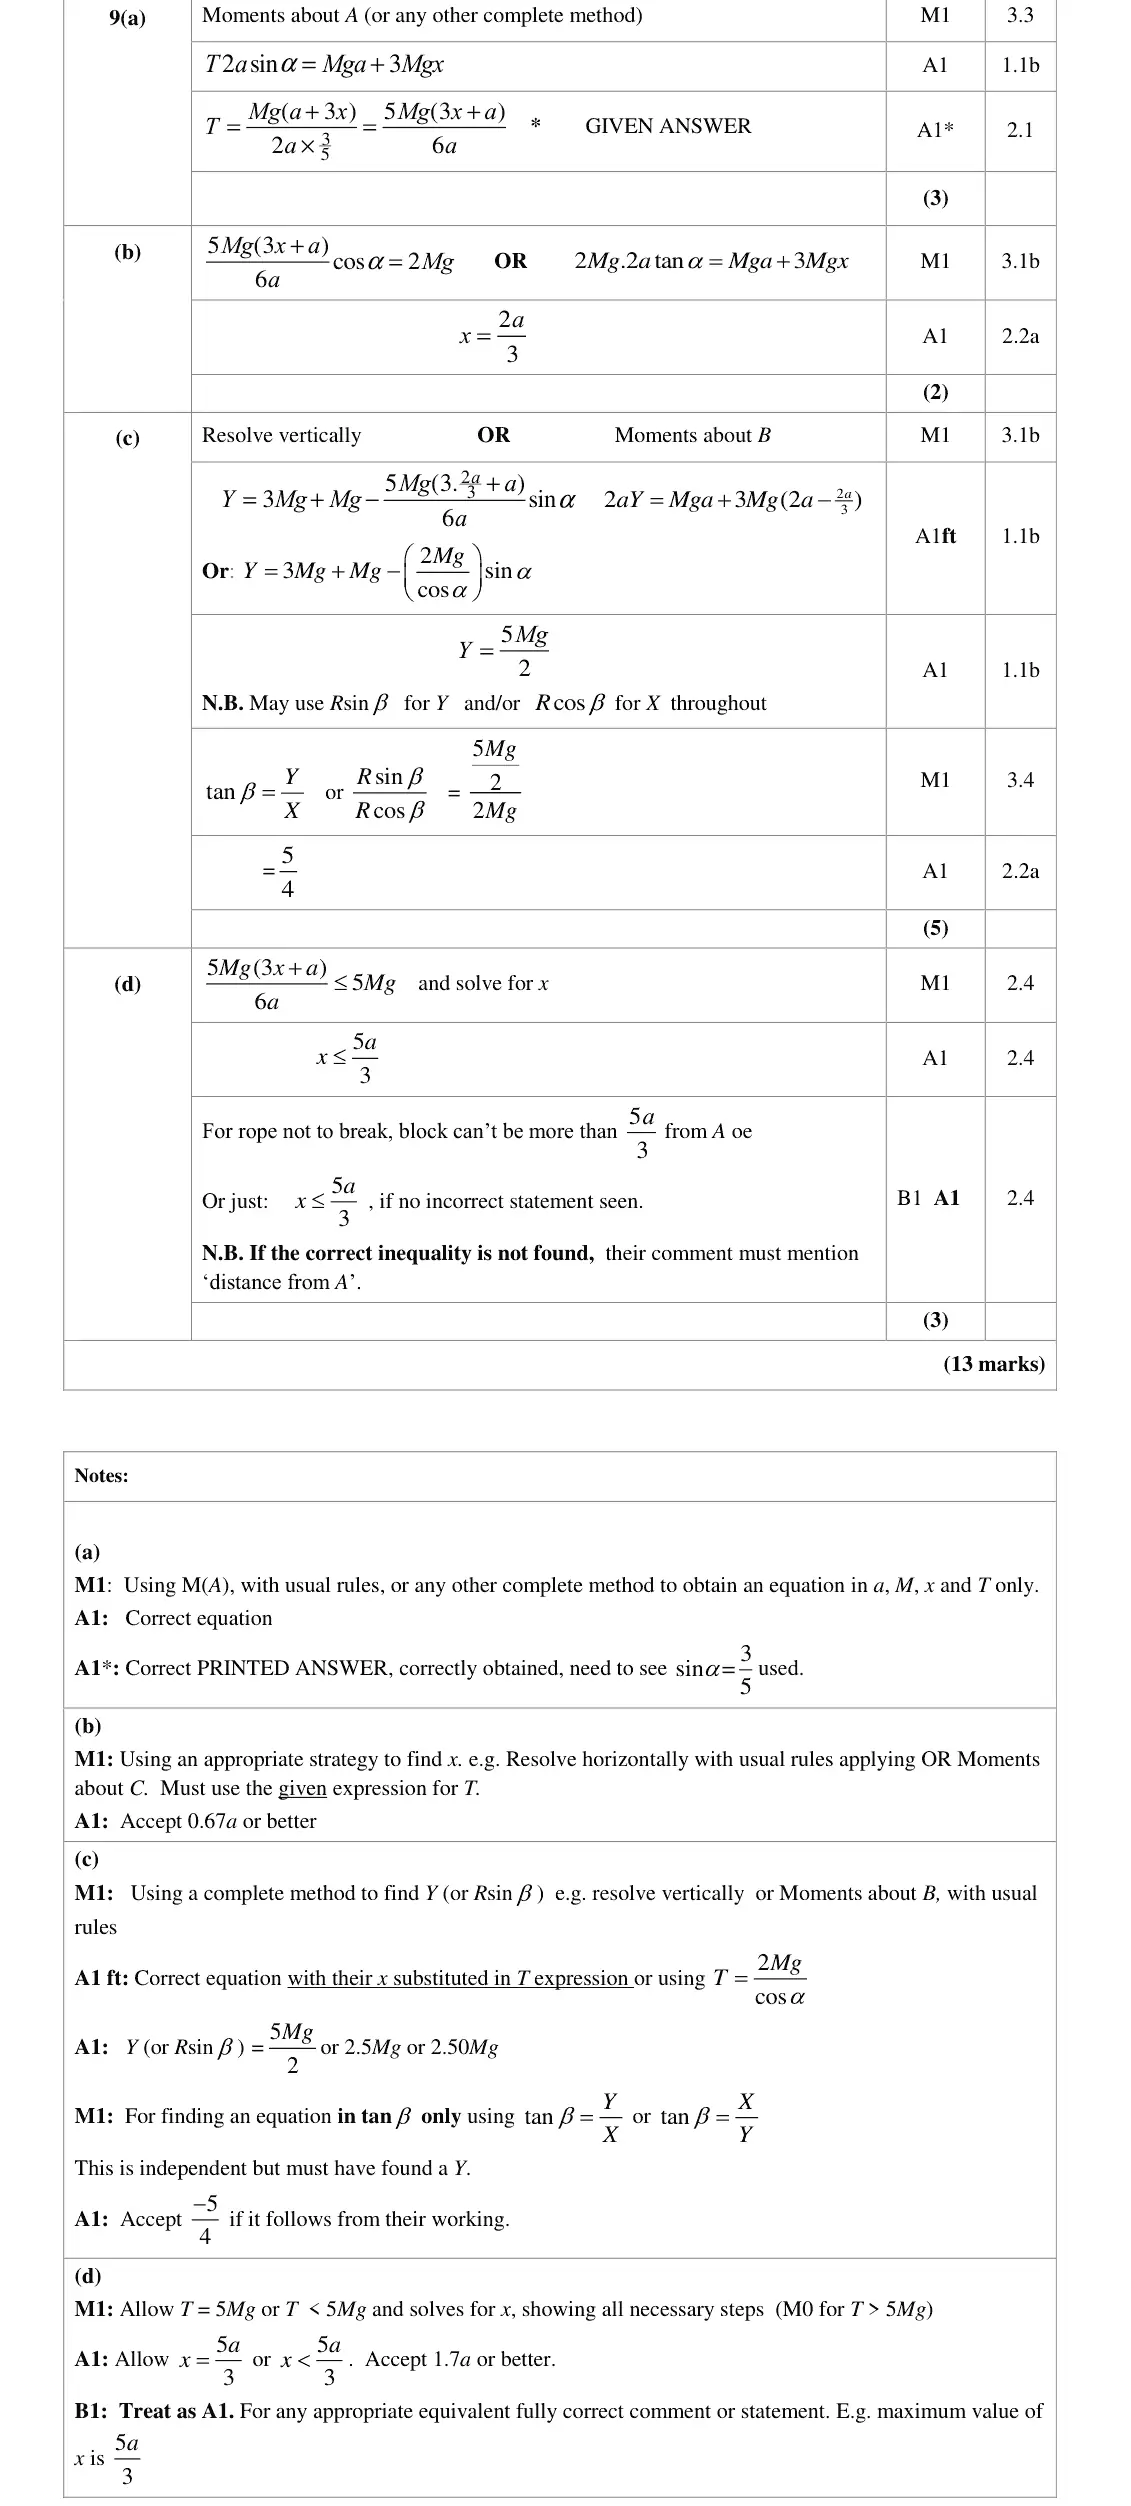
moments about A: T × 2a sin α = Mga + 3Mgx with sin α = 3/5 seen
enough working for the given answer
June 2018 · Paper 3 · Q9(b)2 marks
Mark scheme (whole question; this part is marked with the orange bar)
Examiner's comment
sufficient and accurate but generally this was well done. In part (b), most used a horizontal resolution and the given expression for T to calculate a value of x. Errors in the straightforward algebraic manipulation were surprisingly common, sometimes leading to a dimensionally incorrect value. The most popular approach to part (c) was to resolve vertically to find the vertical component of the
Common mistakes
resolve horizontally T cos α = 2Mg using the given T (or moments about C)
x = 2a/3
algebra slips often gave a dimensionally wrong answer
June 2018 · Paper 3 · Q9(c)5 marks
Mark scheme (whole question; this part is marked with the orange bar)
Examiner's comment
most popular approach to part (c) was to resolve vertically to find the vertical component of the reaction. Occasionally a weight was omitted or the tension was not resolved, but there were a fair number of valid attempts. Again, slips in simplifying the expression were fairly prevalent and sometimes an incorrect value of x was being carried forward. Those who reached an answer which was a multiple of Mg generally gained the final method mark for dividing the components of reaction to find tan beta . Although there were some entirely correct solutions seen, there was evidence of confusion and lack of a systematic approach in other attempts.
Common mistakes
resolve vertically (or moments about B) to find Y = 5Mg/2
tan β = Y/X with X = 2Mg gives 5/4
errors: omitting a weight, not resolving T
June 2018 · Paper 3 · Q9(d)3 marks
Mark scheme (whole question; this part is marked with the orange bar)
Examiner's comment
Part (d) required a calculation of the maximum value of x which was possible for the rope not to break. This required a comparison of the given expression for T with the maximum possible (5Mg). Following correct algebra some students concluded that the weight had to be less than (rather than ‘not more than’ or ‘less than or equal to’) 5a/3 from A and achieved 2 out of the 3 available marks. Those who wrote in general terms about why there was a limit to how far the weight could be placed relative to A could achieve no credit without an attempt to calculate a value of x.
Common mistakes
solve 5Mg(3x + a)/6a ≤ 5Mg to get x ≤ 5a/3, i.e. block no more than 5a/3 from A
strict "<" lost a mark
general comments without calculating x score nothing
Find an Edexcel maths tutor
Stuck on this? Book a trial session with an Edexcel specialist.